The noindex tag is a specific type of meta tag embedded within the HTML of a webpage. This tag directs search engines to exclude a particular page from their index. Essentially, it tells search engine crawlers not to include the page in search results, which means it will not appear when users perform searches related to its content. Today we are going to explore how to remove the noindex tag in wordpress.
For website owners and SEO professionals, understanding and properly managing the noindex tag is crucial. When used correctly, it can help manage your website’s visibility and ensure that search engines focus on the content you want to highlight. However, if misapplied or left unchanged, it can prevent important content from being discovered by potential visitors.
Purpose of the noindex Tag:
- Control Over Indexing: This tag helps you manage which pages are indexed by search engines and which are not. This can be useful for preventing specific pages, such as those under construction or containing duplicate content, from appearing in search results.
- SEO Management: It aids in refining your SEO strategy by ensuring that only relevant and high-quality content is indexed. This helps in avoiding potential issues with search engine ranking due to duplicate or irrelevant pages.
- Temporary Use: The noindex tag is often utilized during the development phase of a website. Pages that are still being worked on or are not intended to be public can be set to noindex temporarily to prevent them from affecting the site’s overall SEO.
Why You Might Need to Remove the Noindex Tag in WordPress
Removing the noindex tag is an essential step for enhancing a website’s visibility and search engine performance. This action is necessary when the tag has been mistakenly applied or when your SEO strategy evolves, requiring a shift in how content is indexed.
Reasons for Removing the noindex Tag:
- Site Launch: Once a website or specific pages are ready for public viewing, the noindex tag should be removed to allow these pages to be indexed by search engines. This ensures that all relevant content is accessible to users through search results.
- SEO Strategy Updates: As your SEO strategy develops, you might need to revisit pages that were previously set to noindex. Updating these settings allows you to align with new SEO goals and ensure that valuable content is included in search engine indices.
- Error Correction: Sometimes, the noindex tag is applied by mistake due to incorrect settings or configuration issues. Correcting these errors is vital to ensure that all intended pages are properly indexed and available to search engine users.

Understanding the noindex Tag
How the noindex Tag Works
The noindex tag functions by being placed in the HTML code of a webpage. Specifically, it is inserted within the <head> section of the page’s HTML. When a search engine crawler encounters this tag, it understands that the page should be excluded from the index.
This means that the page will not be included in search results, effectively hiding it from users searching for relevant content. The tag operates on a meta level, providing direct instructions to search engine bots about how to handle the page.
Functionality of the noindex Tag:
The tag is added using the following line of code:
<meta name="robots" content="noindex">- Meta Tag Placement: This line of code is placed in the <head> section of the HTML, making it an integral part of the page’s metadata.
- Search Engine Response: Search engines, upon detecting this tag, will exclude the page from their index. This action prevents the page from appearing in search results.
- Impact on Visibility: The result is that the page is not displayed in search engine results pages (SERPs). This can be beneficial in managing what content is visible to users but can also limit the page’s potential to attract traffic if applied incorrectly.
When to Use the noindex Tag
The noindex tag is best used in specific scenarios where controlling which pages are indexed is necessary. It helps manage the visibility of pages based on their relevance and status.
Appropriate Use Cases for the noindex Tag:
- Development and Testing: During the development phase of a website or when testing new features, using the noindex tag ensures that incomplete or experimental pages do not appear in search results. This prevents unfinished content from impacting the site’s overall SEO.
- Duplicate Content: If your site has pages with similar content, applying the noindex tag can help avoid potential SEO issues related to duplicate content. This ensures that only the most relevant pages are indexed and ranked by search engines.
- Private or Restricted Pages: For pages that are intended to be private or accessible only to a specific audience, the noindex tag can prevent these pages from appearing in search results. This is useful for content that should not be publicly searchable, such as internal documents or member-only areas.
Common Causes of the noindex Tag in WordPress
Accidental Implementation
The noindex tag can sometimes be added unintentionally due to various factors. Misconfigurations or conflicts within WordPress settings, themes, or plugins can lead to the unintended application of this tag.
Causes of Accidental noindex Tags:
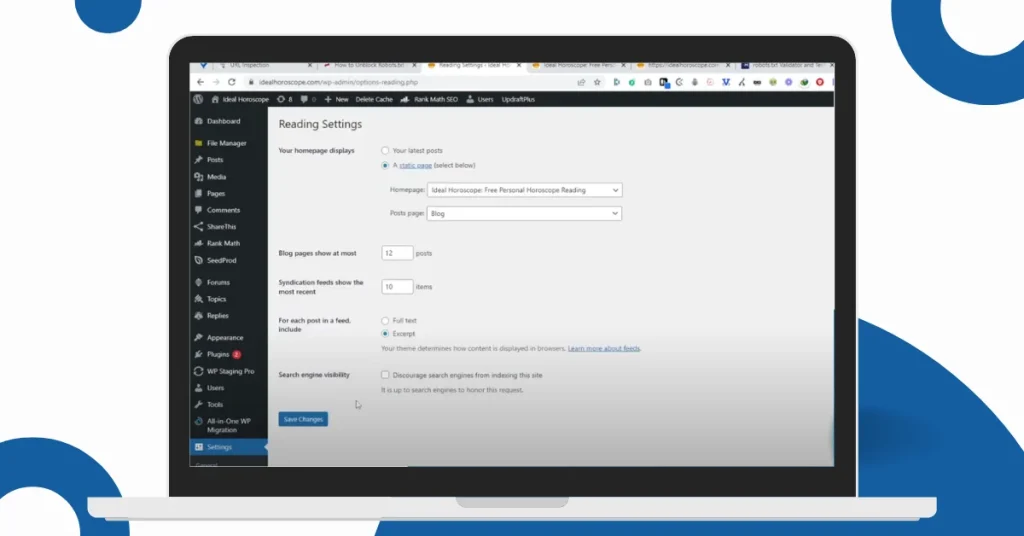
One common cause is incorrect settings within the WordPress dashboard. Users might inadvertently enable options that apply the noindex tag across the site or specific pages. This can happen when the “Discourage search engines from indexing this site” option is checked in the WordPress Reading Settings. Another cause can be conflicts with WordPress themes that automatically add the noindex tag for certain pages, such as those under maintenance or development.
Additionally, plugin conflicts can inadvertently introduce the noindex tag, particularly if multiple plugins have overlapping functionalities related to SEO or indexing.
Intentional Use that Needs Revision
In some instances, the noindex tag is intentionally used but later requires updates. This typically occurs when transitioning from a development environment to a live site or adjusting SEO strategies.
Scenarios Requiring Revision:
During the development of a website, pages might be intentionally set to noindex to prevent them from appearing in search results. However, once the site is ready for launch, these pages should be reviewed, and the noindex tag removed to ensure they are indexed. Similarly, if content was set to noindex while being updated or revised, it may need to be reindexed after completion to reflect changes in the site’s content. Additionally, SEO strategy changes may necessitate revisiting and updating noindex settings to align with new goals and priorities.
How to Identify the noindex Tag
Inspecting Page Source
To determine if a page has the noindex tag, you can inspect the page’s source code. This process involves viewing the HTML code of the page to check for the presence of the tag.
Steps to Inspect Page Source:
- Open Page Source: Navigate to the page you want to inspect. Right-click on the page and select “View Page Source” or “Inspect” from the context menu.
- Search for noindex: In the page source view, use the search function (Ctrl + F or Command + F) to find the term <meta name=”robots” content=”noindex”>. This will highlight any occurrences of the tag.
- Verify the Tag: Ensure that the noindex tag is present within the <head> section of the HTML. This confirms that the page is set to be excluded from indexing.
Using SEO Tools
SEO tools can provide a more comprehensive overview of your site’s indexing status. These tools scan your website and offer detailed reports on pages with noindex tags.
Popular SEO Tools:
- Screaming Frog: This tool crawls your website and generates a report that highlights pages with noindex tags. It allows you to see which pages are affected and take necessary actions.
- Sitebulb: Similar to Screaming Frog, Sitebulb provides in-depth analysis of your site’s SEO elements, including noindex tags. It offers insights into indexing issues and helps you manage them effectively.
- Google Search Console: This free tool from Google offers valuable insights into your site’s indexing status. It can help you identify pages with indexing issues and provides recommendations for improvement.
Top 5 Ways to Fix the noindex Tag Issue in WordPress
Ensuring your content is properly indexed by search engines is vital for achieving better visibility and attracting organic traffic. The methods outlined here will help you resolve noindex issues efficiently. If you follow these steps and still face difficulties, it might be useful to consult with a WordPress specialist for more tailored solutions.
1. Adjusting WordPress Reading Settings
The noindex tag may be applied due to a setting in WordPress. This setting can be found in the Reading Settings.

Steps to Fix:
- Log in to WordPress Admin: Access your WordPress dashboard by logging in with your admin credentials.
- Navigate to Reading Settings: In the WordPress dashboard menu, click on “Settings” and then select “Reading.”
- Check Search Engine Visibility Option: On the Reading Settings page, find the checkbox labeled “Discourage search engines from indexing this site.” If this box is checked, your site is set to noindex.
- Uncheck the Box: Uncheck the box next to “Discourage search engines from indexing this site” to allow search engines to index your site.
- Save Changes: Click the “Save Changes” button at the bottom of the page to apply your new settings.
- Verify Changes: Use Google Search Console to confirm that the noindex tag has been removed from your pages.
2. Removing noindex Tags from Individual Pages
If only specific pages or posts have the noindex tag, you need to remove it manually from each item.
Steps to Fix:
- Log in to WordPress Admin: Access your WordPress dashboard by logging in with your admin credentials.
- Edit the Page or Post: Go to “Pages” or “Posts” in the dashboard and select the item you want to edit.
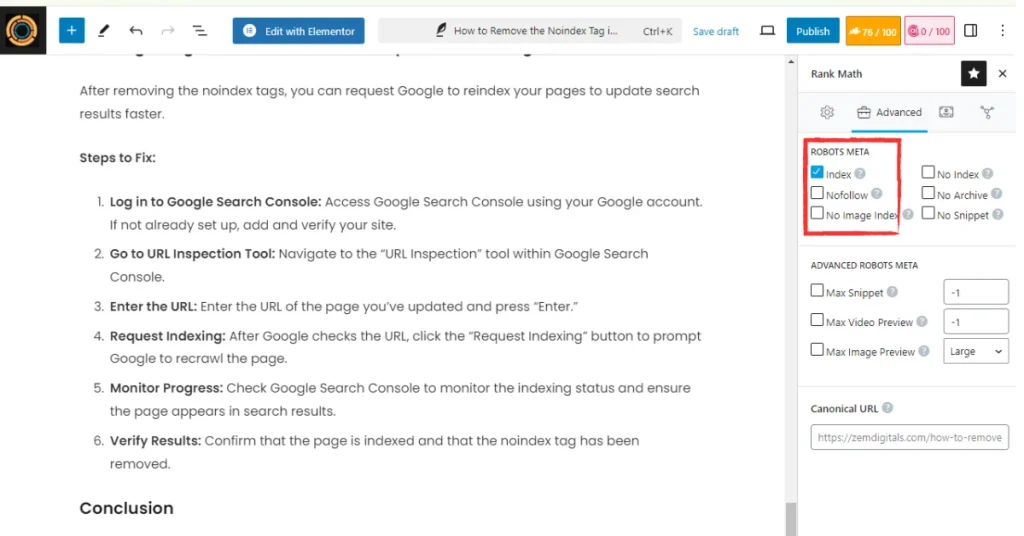
- Access SEO Settings: Find the SEO settings section provided by your SEO plugin, such as Yoast SEO, usually located below the content editor.
- Check the Indexing Option: Ensure that the indexing option, such as “Meta Robots Index,” is set to “index” and not “noindex.”
- Update or Publish: Click “Update” or “Publish” to save your changes and remove the noindex tag.
- Verify Changes: Use Google Search Console to check if the page is now indexed by search engines.

3. Checking and Adjusting Theme Functions
Certain WordPress themes might automatically add the noindex tag. You may need to edit the theme’s functions to remove this tag.
Steps to Fix:
- Log in to WordPress Admin: Access your WordPress dashboard by logging in with your admin credentials.
- Navigate to Theme Editor: Go to “Appearance” and select “Theme Editor.”
- Locate Relevant Theme Files: Open the header.php or functions.php file within the theme editor.
- Search for noindex Code: Look for any lines of code that include meta name=”robots” content=”noindex”.
- Remove or Modify the Code: Remove or adjust the code to prevent the noindex tag from being added.
- Save Changes: Click “Update File” to save your modifications and ensure no other code is affected.
- Verify Changes: Clear your site’s cache and check the page source to confirm that the noindex tag has been removed.
4. Deactivating or Configuring SEO Plugins
SEO plugins like Yoast SEO or All in One SEO Pack can sometimes add the noindex tag. Adjusting these plugins can resolve the issue.
Steps to Fix:
- Log in to WordPress Admin: Access your WordPress dashboard by logging in with your admin credentials.
- Locate Your SEO Plugin: Go to “Plugins” and find the SEO plugin you are using, such as Yoast SEO or All in One SEO Pack.
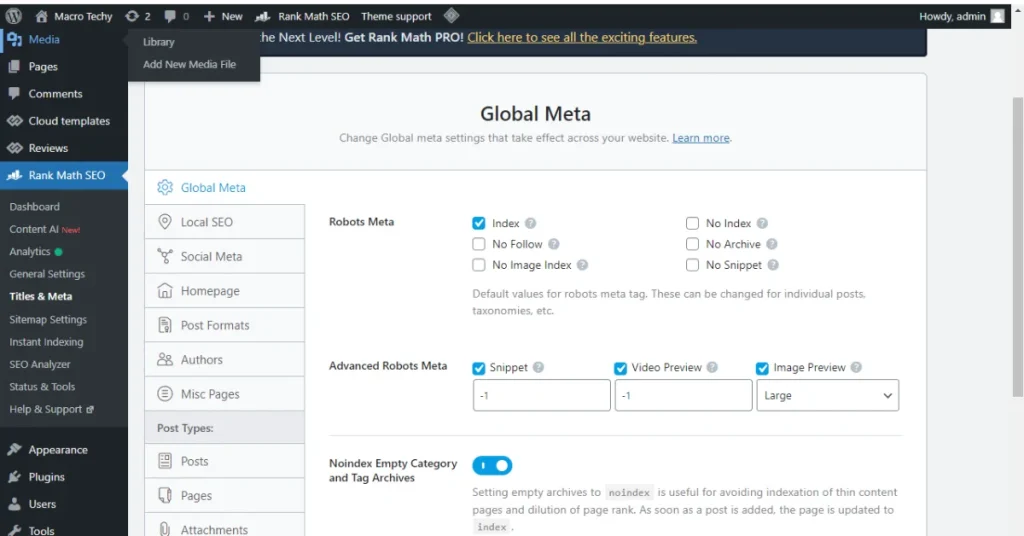
- Access Plugin Settings: Navigate to the settings page of your SEO plugin.
- Check Indexing Settings: Ensure that the plugin is configured to allow indexing. Disable any settings that might be applying noindex tags.
- Save Changes: Save your settings within the plugin to apply the new configuration.
- Verify Changes: Use Google Search Console to ensure that your pages are now indexed.

5. Using Google Search Console to Request Reindexing
After removing the noindex tags, you can request Google to reindex your pages to update search results faster.
Steps to Fix:
- Log in to Google Search Console: Access Google Search Console using your Google account. If not already set up, add and verify your site.
- Go to URL Inspection Tool: Navigate to the “URL Inspection” tool within Google Search Console.
- Enter the URL: Enter the URL of the page you’ve updated and press “Enter.”
- Request Indexing: After Google checks the URL, click the “Request Indexing” button to prompt Google to recrawl the page.
- Monitor Progress: Check Google Search Console to monitor the indexing status and ensure the page appears in search results.
- Verify Results: Confirm that the page is indexed and that the noindex tag has been removed.
Conclusion
Fixing the noindex tag issue in WordPress is crucial for ensuring that your content is visible and accessible to search engines. By adjusting the settings in WordPress, removing noindex tags from specific pages, modifying theme functions, configuring SEO plugins, and using Google Search Console to request reindexing, you can effectively manage how your site is indexed. Implement these steps to resolve indexing issues and improve your site’s visibility in search results. If you encounter persistent problems, consider reaching out to a WordPress expert for further assistance.


